Photograph star trails in Morocco

Photographing star trails straightforward, and I will help you and teach you what you need to know to come back with amazing astro images from this Morocco expedition

See Tour Page

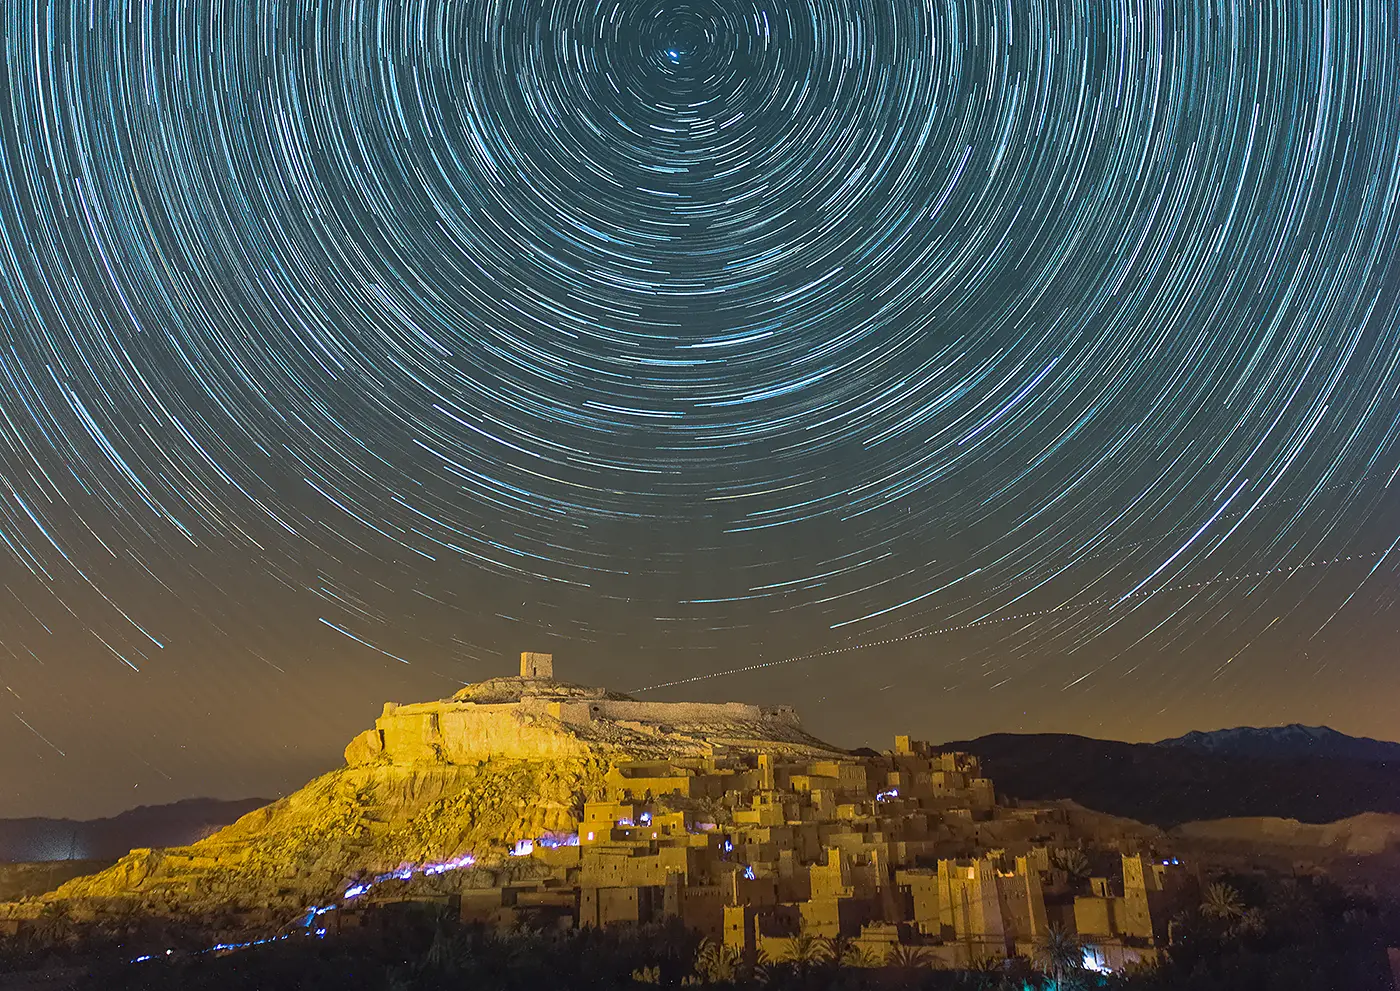
Morocco has some fantastic locations for shooting star trails, including my favourite destination: the ancient ruined Ksar or fortified village of Air Benhaddhou. This atmospheric location has been used in countless films and TV shows, including Game of Thrones, Gladiator, Jewel of the Nile and even the 1975 classic, The Man Who Would Be King.

Obviously your first concern is to choose a location that looks good: you want an interesting foreground, but one which is not too close to the camera as this can cause issues with focus. You can shoot star trails behind a closer object like a tree, but it is a lot more complicated. A far away subject, such as the ruined Ksar, or a series of sand dunes in the Sahara Desert, will give you an iconic foreground for your image.

You also need to find a location that doesn't suffer from light pollution, as this will make for foreground too light, and over-power the stars. Light pollution might be from street lights or buildings, but it can also be from a full moon. If the moon is too bright, then it can have the same effect of making the foreground too light. You will need some light though, if you want to see any detail in the foreground. If there isn't some ambient light around, then a narrow, quarter moon can be perfect.

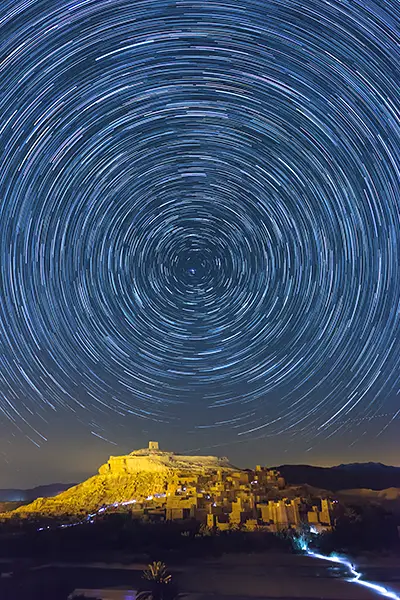
One of the beauties about shooting star trails at Ait Benhaddhou is that it lies directly under the North Star, so you can create a full circle of images. Shooting in other orientations will give a sweep of images.

There are essentially two ways to shoot star trails: one is to use a very long exposure, the other is to take a series of images at 30 seconds each, and then stack them together. I prefer the latter method, as if something goes wrong – such as a battery issue – you can still get something from the images you have already shot. Also if one of more of the images is compromised by something like a motorbike riding into your foreground and overexposing the image, you can simply drop the affected frames. You might get a small gap in the star trails, but it will be imperceptible.

Once you have selected your location, then a simple way to shoot star trails is outlined below:

  • 1. Set up your tripod and compose – shooting vertically with a wideangle lens will allow you to include a large section of sky.
  • 2. Focus the lens – Switch off autofocus, and manually set the camera to the be focussed on infinity, select the widest aperture (or possibly  f4 if you have a fast lens), and select the highest ISO. Select manual exposure on your camera, and take a shot at 2 seconds and then check exposure and focus.
  • 3. Assess the image – Assess the exposure and zoom in to check focus. Check the exposure using the histogram so you don't underexpose, and adjust the exposure. Zoom in and check the focus - if not sharp, then make a small adjustment.
  • 4. Reshoot and reassess – Take another shot and reassess. After a few shots you should have the exposure and the focus sorted. 
  • 5. Calculate the exposure – Ideally you will want to shoot multiple images at 30 seconds exposure. A simple way to balance the exposure is to use the clicks on your camera settings. These will usually be third stops, but might be half stops. Count how many clicks to increase the shutter speed to 30 seconds, then reduce the ISO by the same number of clicks. Your overall exposure will be the same. 
  • 6. Take your images – Switch off all ambient light and torches, connect your remote release (or program the camera) and shoot repeated exposures. I use a simple locking release, a 30 second exposure and a drive setting on the camera. As soon as one exposure is finished, the camera will automatically take another one. I have found this to give the shortest time between images. [Note: Make sure that any long exposure noise reduction on your camera is switched off first]
  • 7. Kick back and relax – You might be shooting for at least an hour, so relax whilst your camera does all of the work. Chat, look at  the stars, and if it is culturally appropriate, crack a drink or two. Just avoid touching the camera or using any lighting that will affect the foreground.
  • 8. Go to bed – When you have shot enough, then stop the remote release and then switch off the camera. You can either try another angle or call it a day for the night.
  • 9. Process your images – RAW process one of the images, then apply the corrections to all of them. Export the images into a folder, at full resolution. StarStax can read JPEGs or TIFFs but the final image will be in the same format.
  • 10. Stack your images – Drag all of the finished images into StarStax, and then select Blending > Gap Filling. Select Edit > Start Processing, and the program will stack all of the images together.  When it is finished then simply save the finished image.

This is only one way to create star trails: there are a number of advanced techniques you can use, including rephotographing the foreground at a much lower ISO and longer exposure to get a better quality result, and then cut and paste the better quality foreground into the image over the blended foreground. You can change the focus, but obviously don't change the crop. You can also use the constituent images to create a timelapse.
What Camera gear will I need to photograph star trails in Morocco?

As well as the general photography gear I would advocate taking on any trip, there are a few specific pieces of equipment that are vital to photograph star trails in Morocco.

  • Wideangle lens - in order to be able to compose your picture with as many stars as possible, you will need to include as much sky as possible, so bring along your widest focal length lens. I will typically shoot with a 14mm focal length, which allows me to include a large section of sky above the foreground.
  • Travel tripod - A good travel tripod is obviously vital to shoot any type of astro photography. You will need a tripod that is stable enough not to shake on long exposures, but not so heavy it becomes a liability. The best combination of weight and stability would be a tripod made of carbon fibre, but these tend to be more expensive. Having a tripod with a hook means that you can hang a camera bag from the tripod to increase weight and stability.
  • Remote release - You will need some sort of locking remote release to allow you to shoot star trails in Morocco. What you need is a way to lock the shutter open so that you can shoot with the maximum 30 second exposure that is built into most cameras; then the camera will take endless 30 second exposures one after the other, without you having to do anything. Some cameras are compatible with electronic releases, where you can program in repeated 30 second exposures; and some more sophisticated cameras can allow you to program the camera directly without the need for an external release.
  • Stacking software - If you are going to take multiple images and stack them, then you will need some sort of stacking software. I use StarStax, which is both free and has versions for Mac and PC. The software can automatically retouch out the tiny gaps between frames. 
  • StarStax can be downloaded on this link.

If you are like the idea of photographing Star Trails in Morocco, then why not join me on an exclusive travel photography tour to Morocco with all land arrangements and comprehensive travel industry bonding supplied by Intrepid Travel, who are one of the leading names in small group adventure travel. On this trip we will have a number of opportunities to shoot star trails, including at Ait Benhaddhou – my most favourite location in the country. You can see more details below, or see the full tour page by clicking here.

Unique Marrakech Morocco photo tour

Join us on this 14 day captivating photographic voyage through Morocco, combining the unmissable  towns of Marrakech and Essaouira with more unexplored desert regions. 

See Full Tour Page
Marrakech photo tour Djemma-el-fnaa sunset Join our Mailing list

Impressions of Morocco

An adventurous photographic journey through the culturally rich and historic country of Morocco: photographing dunes in the Sahara Desert, star trails over the ruined Ksar of Ait Benhaddhou, traditional Amazigh villages and granaries of Morocco's Anti-Atlas region and the entrancingly unspoilt walled town of Taroudant - hailed as Little Marrakech. We finally explore the coastal harbour town of Essaouira and Marrakech - the Jewel in Morocco's crown.

Highlights:
  • Djemaa el Fna square Marrakech
  • Ait Benhaddou star trails
  • Saharan dunes at Erg Chegaga
  • Remote Tafraoute
  • Essaouira harbour seafood
  • Traditional walled Taroudant
  • Expert photography support